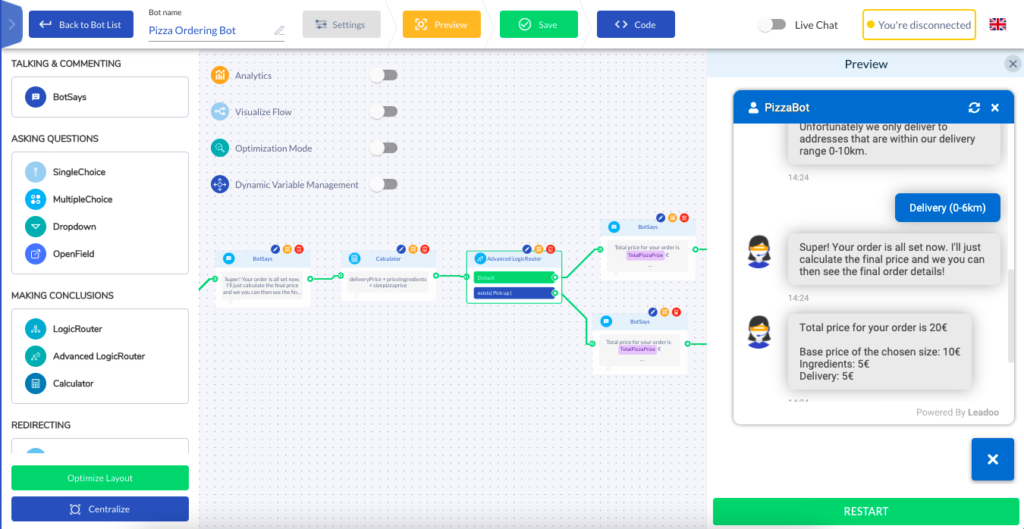
Learn to build a bot that can make and display mathematical and logical conclusions using dynamic variables and labels in calculator and advanced logic router nodes.
Quick browse the guide
Case: Price calculator bot for a pizza order
Let’s say you want to create a bot that calculates and displays the breakdown of the total price of a pizza order. The equation for the total price could be
base + ingredients + delivery = totalPrice
where he individual pricing variables consist of items like this:
Base price depending on size of the pizza
– Small (7€)
– Medium (10€)
– Large (17.5€)
Ingredient options
– Ham (1€)
– Extra cheese (1€)
– Pepperoni (1€)
– Salami (1€)
– Pineapple (1€)
– Minced meat (1€)
– Chicken (2€)
Delivery
– Pick up from the restaurant (free)
– Delivery 0-6km (5€)
– Delivery 6-10km (7€)
Here’s how to build the bot
Step-by-step guide
Follow these steps to build a price calculator bot. In this example, we use the pizza order example, but the same practices can be applied to other cases as well.
If you’re unsure how to apply this example to your use case, contact your Customer Success Manager for personal guidance.
Step 1: Create the Dynamic Variables
Open the Dynamic Variable Management panel by activating the toggle in the upper left corner of the bot builder.
Add your first variable by clicking the blue button in the Dynamic variable control panel.
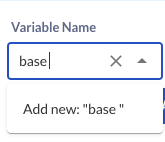
Type the name of the first variable to the Variable Name field. Select the suggested “Add new” alternative from the dropdown that appears.
Switch the Type to number, since price is a numeric variable.
In default value field type 0. This means that, before any selections for the pizza’s ingredients or delivery have been made, the price is 0 and the order doesn’t exist.
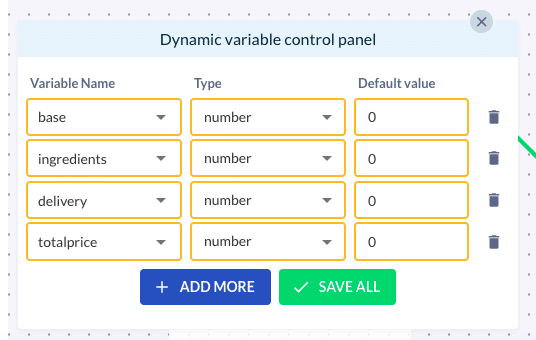
Repeat the process to the other two variables as well so that you’ll end up with these four variables in the panel
base – number – 0
ingredients – number – 0
delivery – number – 0
totalPrice – number – 0
Step 2: Attach the Dynamic Variables to the answer choices
Next step is to attach new values for the dynamic variables in each answer choice. This means that the price calculation adds up depending on what the user selects in the bot.
In this example it’s best to use SingleChoice and MultiChoice nodes. For example, for the Question 1 (What size pizza you want to order?), use SingleChoice node and add the three answer choices (Small, Medium, Large) to the node. Then proceed to attaching the variable base to each answer choice like this:
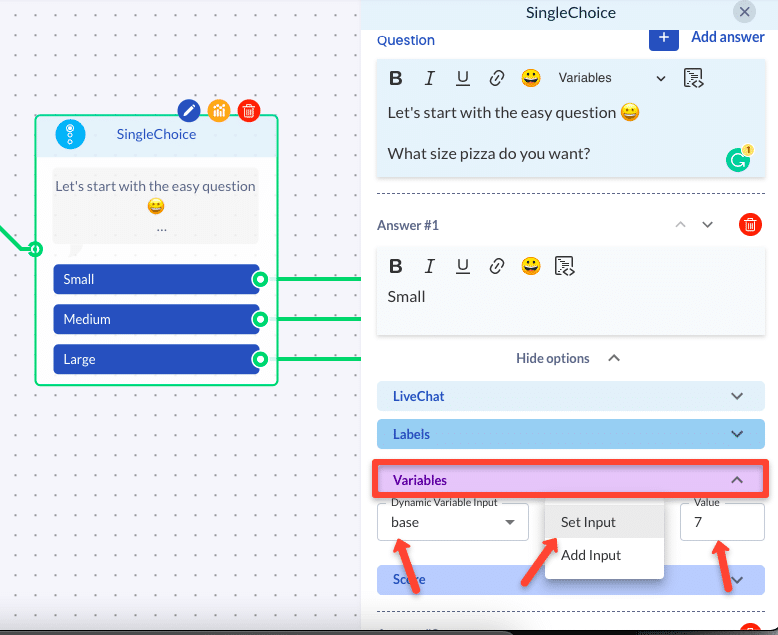
Click Show options from the first answer choice (“Small”) -> Open the Variables setting marked in purple -> Click Dynamic variable input and select variable base -> Select “Add to value” from the dropdown -> To value field, write the price you want to attach (7 in this case).
Use numbers only (so write 7 instead of 7 euros).
Repeat the process for the other two answer choices as well by following path Show options -> Variables -> Dynamic variable input -> Add to value ->Type price as a number.
Repeat the whole node building and variable attachment process also for the rest of the questions needed in the calculation:
Question 2: Which ingredients do you want into your pizza? (MultiChoice – Variable: ingredients)
– Ham – 1(e)
– Extra cheese – 1(e)
– Pepperoni – 1(e)
– Salami – 1(e)
– Pineapple – 1(e)
– Minced meat – 1(e)
– Chicken – 1(e)
Question 3: Do you need delivery? (SingleChoice – Variable: delivery)
– Pick up from the restaurant – 0(e)
– Delivery 0-6km – 5(e)
– Delivery 6-10km – 7(e)
Step 3: Attach label where needed to allow later routing with Advanced Logic Router node
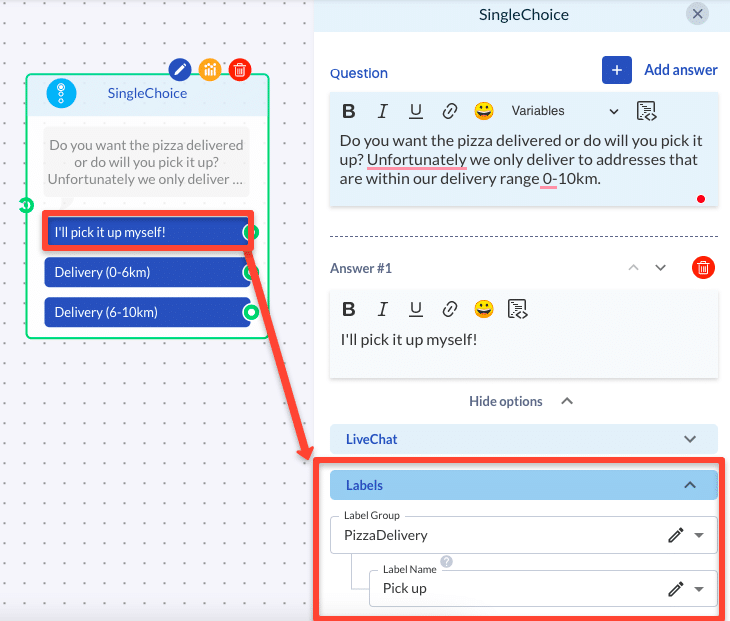
In the pizza delivery case, using labels will allow us to later separate the pick-up orders from the ones that need delivery with Advanced logic router node, and display the price accordingly. Hence, for the answer choice “Pick up from the restaurant” in question 4, we will want to add label “pick up”.
Add the label through Show options -> Labels -> Select/Create new label group -> Select/Create new label.
Step 4: Use Calculator node to calculate the price
After adding the questions and answer choices for the pizza and delivery selections, sum up the total price by adding the calculator node to the bot.
Open the calculator node and start filling the formula to the equation field. You can either…
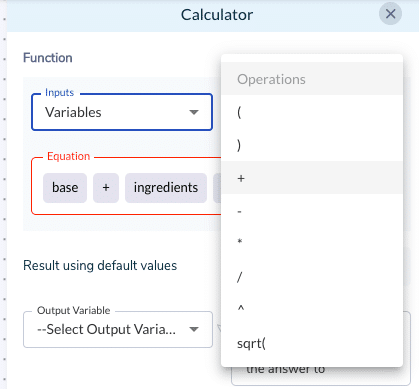
A) Select the variables and operations one by one from the from the Input (variables) and Operations (operations) dropdowns.
[E.g. (delivery) (+) (base) (+) (ingredients)]
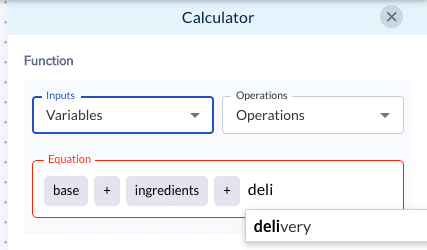
B) Type the equation by hand. The system will auto-suggest any variables or operations available in the system. Just select the correct suggestion and press enter to confirm the selection.
Finally, remember to save the result of the calculation to the totalPrice variable by selecting it from the Output variable dropdown.
If you want, you can use the + and – signs to define the precision with which the output total will be saved (e.g. 16,50e or 16e).

Step 5: Create routing condition for Advanced Logic Router
Now that you’ve done the calculation, it’s time to display it to the user. If user selected delivery, we’ll also want to display separately how much it is, so let’s start with that.
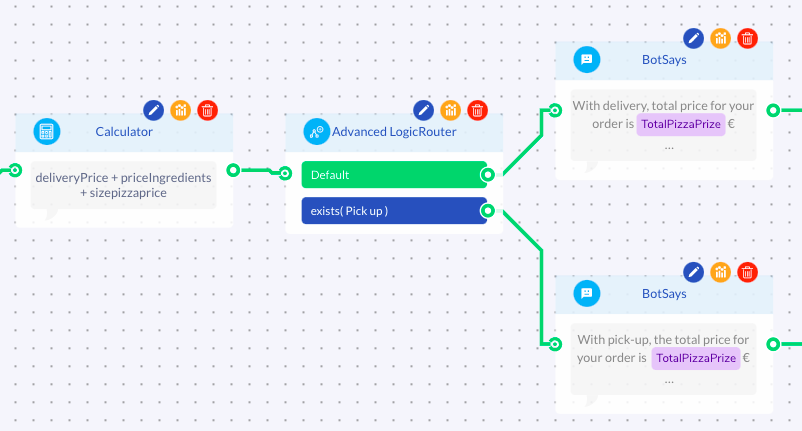
Connect Advanced LogicRouter node to the Calculator node.
For Condition 1 field select Operations -> exist(x). Then in Input select Label -> pick-up. This creates the condition exists (pick-up) to the condition field. If you want, you can also type this by hand with the help of the auto-suggesting the same way as you could do in calculator node.
The condition exists (pick-up) means that before routing the user forward in the discussion, the system checks if the user has selected an answer with the label “pick-up”. For cases where that special condition is not true (i.e. in this case, the user selected a delivery option instead), the Default route will apply.
Step 6 (extra): Display breakdown of the total price to the user using variable repetition
If you want, you can display the breakdown of the total price to the user using the Variables dropdown in a node.
In the pizza order case, we’ll want to add two separate routes with the advanced logicrouter to make sure the price is displayed correctly: one for the default route with delivery and one for the conditioned route with pick-up.
Write the content of your choice to the nodes. In the parts where you’d like to display a variable, open the Variables dropdown and select the dynamic variable you want to repeat. The variable will appear to the builder as a purple text block.

For example:
Total price for your order is [totalPrice]€
Base price of the chosen size: [base]€
Ingredients: [ingredients]€
Delivery: [delivery]€
Finally, test the bot in preview mode to see that the calculations work as intended.
